HOW TO USE THE R2
The Revolution Imager R2 features a series of a on-screen menus that allow you alter the exposure settings, adjust colors, enable stacking and host of other features. This page will introduce you to the menu system and some of the options.
You can also download a printable version of this manual and a quick-start guide:

|
Quick Start Guide |
 |
Reference Manual (Printer Friendly) |
don't panic!
The revolution imager camera has a lot of options and is extremely versatile and it can be easy to become overwhelmed with all the options available to you, which is why we have provided some suggested settings for different types of objects.
However, the key to success with the camera and with most things in astronomy is to experiment with different options and see what happens! You can always use the provided guides to get back to settings that will work for you, so go ahead and have fun. Find something cool? Let us know! Everyone’s telescopes, mounts, skies, conditions and experiences are different, and the Revolution Imager is versatile enough to be a useful tool for you.
If you get lost you can also easily do a system reset and bring all the settings back to defaults.
the remote control
 The on-screen menus are accessed and navigated using the supplied hand remote. The menus can also be accessed using the 5 buttons on the back of the camera. To access the on-screen menu press the center button on the remote. The directional up/down/left/right buttons are used to move around the menus and the center menu/ok button is used to enter different menus and select items.When you press the center button of the remote the main menu will be displayed, at this point press the up and down buttons will switch between the main menus available. To enter one of the sub menus press the center button. When you're in a main menu use the up and down buttons to move between the available options. If an option displays a "⏎" symbol, you can press the center button to open a sub-menu with further options.
camera concepts
The Revolution Imager camera contains a host of features that are useful for astronomical purposes and a number of features are designed for it's day-time or night time use a security camera. On this page we will outline the options that you need to use to start observing tonight.
Before we start digging into the on-screen display options, let’s cover a few of the basic concepts of using the Revolution Imager.
Exposure Time
Exposure time is the amount of time the camera will spend collecting valuable photons for each frame. Exposure time on the camera is either set to fractions of a second, or multiples of the camera's video frame-rate which is 1/50th of a second, this table below is a handy reference for exposure times:
| Setting | Time |
|---|---|
| 1/100000, 1/10000, 1/4000, 1/2000, 1/1000, 1/500, 1/250, 1/100, 1/50 | Fractional second exposures |
| x2 | 0.04 seconds or 1/25 of a second |
| x4 | 0.08 seconds or ~1/12 |
| x8 | 0.16 seconds or ~1/6 |
| x16 | 0.32 seconds or ~1/3 |
| x32 | 0.64 seconds or ~1/2 |
| x64 | 1.2 seconds |
| x128 | 2.56 seconds |
| x256 | 5.12 seconds |
Gain or “AGC”
The amount of signal boost/amplification the camera will apply to the image. The Revolution Imager uses a system called "Automatic Gain Control" or "AGC" to apply gain to the image. You can set the maximum amount of gain, low, medium, or high and the camera will adjust the gain to produce an image. You can, also, set a fixed gain setting and the camera will apply that level of gain permanently.
Noise Reduction or “Stacking”
The Revolution Imager can combine up to 6 consecutive frames to average out noise and produce a smoother image. This process improves the vital signal-to-noise ratio that helps makes those faint-fuzzies that are invisible in your eyepieces visible to you.
Brightness and Contrast
These settings affect the overall brightness of the image, brightness is a simple adjustment of brightness whereas contrast affects the brightness of different areas of the image in order to improve visibility.
Color
There are options that deal with how color will be handled: full color or black and white. It is also possible to alter the color balance which can be useful which imaging the Sun.
Electronic Zoom
The R2 has the ability to electronically zoom in on the center of the image to aid in bringing out any hard-to-see-details on an object.
Initial Setup
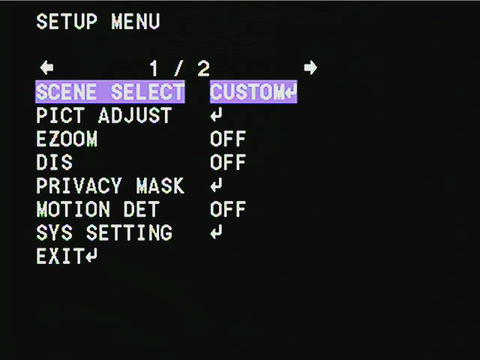
In order to get started make sure the camera is in “CUSTOM” scene mode. Start by pressing the ENTER button, navigate to “SCENE SELECT” using the up and down buttons and select CUSTOM by using left and right keys.
Settings
Exposure Mode
Setting the exposure time and gain are the two controls you will use the most when using the Revolution Imager. To enter the menu to alter these scroll to the “SCENE SELECT” item and press the OK button.

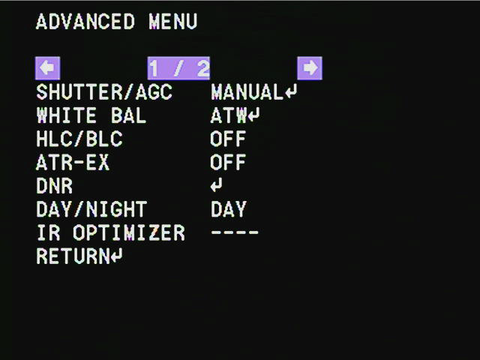
The SHUTTER/AGC setting has 3 options that you can change using the left and right buttons.
- AUTO
- AUTO places the camera in “full autopilot” where it will pick the exposure time and gain and attempt to find the best settings.
- MANUAL
- MANUAL mode allows you select the exposure time and a maximum gain value that the camera will apply to the image. The camera will auto-adjust the gain value to give you a clear image that isn’t blown-out.
- FIX
- FIX mode allows you select the exposure time and a fixed gain value that the camera will apply to the image. This gives you full manual control over what the camera is doing. This mode is useful for viewing very faint objects and focusing.
After selecting the exposure mode you want to use, press the “OK” button to bring up the controls for that mode. We find the best setting for most cases to be “MANUAL” and “FIXED” when focusing.
Exposure Time and Gain

Pressing “OK” on the exposure (SHUTTER/AGC) mode allows you to set the shutter speed (exposure time) and the AGC/gain. Use the up and down and left and right buttons to alter these values. When altering SHUTTER the values marked “FLD” are the extended, long-exposure modes described in the concepts section. The highest value you can select here is “256 FLD” which is 5 seconds.
Noise Reduction / Stacking

You can instruct the camera to stack up to 6 images to reduce noise which helps bring out those “faint fuzzies.” In the Advanced menu after selecting “CUSTOM” from the main menu, select the “DNR” option and use the left and right buttons to increase or decrease the number of stacked frames.
Brightness, Contrast and Other Adjustments

The RI2 has a number of options for adjusting the displayed image that are available in the “PICT ADJUST” option on the main menu. You can use the up-and-down keys to select an option and the left and right keys to adjust.
Note: The BRIGHTNESS setting also affects the amount of gain the R2 will apply when using the “MANUAL” exposure mode. The BRIGHTNESS sets a guideline for the amount of gain applied.
Color
The RI2 can be switched between different color modes to control if you want to see the image in full color or in black and white only, which can be useful when using narrow band filters. To change the color mode select the “SCENE SELECT” option in the main menu, scroll down to “DAY/NIGHT” and set DAY for color, NIGHT for black and white, or select AUTO to have the camera decide.
Electronic Zoom
To enable electronic zoom, scroll to "EZOOM" in the main menu and use the left/right buttons to change the value to "ON". You can then press the center button to enter the EZOOM menu to set the zoom level. The PAN and TILT can be used to move around the image when you have zoomed in.

Saving your settings
In order to save your settings for use later return to the main menu and select the "EXIT" option. In that menu you can select the following options:
- SAVE: Save your new settings as the default when you power on the camera.
- NOT SAVE: Discard your new settings and exit the menu.
- CANCEL: Discard your new settings and return to the defaults.
- BACK: Return to the main menu.

Recommended Settings
Here are some settings we recommend trying:
- For most deep sky objects, including emission nebula, larger planetary nebula, open clusters, large globular clusters, dim planets and large galaxies:
- Use exposure mode "MANUAL" with exposure time "64 FLD" and AGC MAX at the highest setting. This will allow the camera to auto-adjust the adjust gain to produce a satisfying image
- Use the highest DNR setting, 6.
- For dimmer objects, like smaller globular clusters, galaxy clusters and dim open clusters
- Use exposure mode "FIX" with exposure times from 64 to 256.
- In "FIX" mode the camera will apply the gain you specify, in this case you will have to experiment to find the gain setting that produces a satisfying image without blowing out the background
- Start off with a DNR 0 to find the a exposure time and gain setting that produces a visible image and then increase to bring out the object more
- For Bright Planets like Jupiter, Saturn, Mars and Venus and Lunar imaging
- Use exposure mode MANUAL with exposure time at around 1/250 depending on your telescope, adjust this value until you can see the surface detail of the planet
- Use DNR but only up to 2. Higher settings may produce a blurry image due to turbulence
- Use the electronic zoom feature to bring out smaller features
Experiments
The key to success with the RI2 is experimentation, and more importantly fun! Try different settings and options and see what works for you. Here’s some suggestions on things you can try:
- Try using a red filter, either a #25 or #29 and put the camera in black and white (NIGHT) mode. This allows the camera to see mostly infrared light which can be great for viewing dim galaxies
- Try enabling the ATR-EX feature in the “ADVANCED MENU” the ATR-EX feature can help increase contrast on some objects.
- Try using the camera with and without the supplied focal reducer. The focal reducer will give you a wider field of view and decrease the amount of exposure time you need to view objects, without the focal reducer you will get a larger imager scale and may see more details in some objects
- Try using the camera with a USB capture card along with SharpCap on windows to use the new live stacking feature to go even deeper in your own backyards.
- Try using the camera with a USB capture card with SharpCap to capture videos to process in Registax.